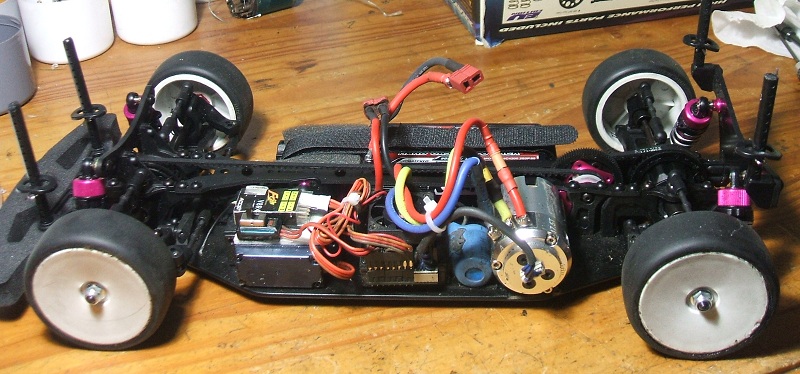
Building and setup of a Sakura Zero-S for racing in the 17.5 Blinky class at Adur Model Car Club.
Why?
The one class of radio control race car that always seems to be popular is the Touring Car.
When asked to recommend a car for a beginner, I want to say, get a touring car, because of that popularity,
but modern touring car chassis kits are becoming more expensive as the sophistication grows, and Sterling falls in value.
In the past, manufacturers have produced competent cut down versions of their main cars, such as the Xray T2R and T3R,
and HPI with their Cyclone-S.
But even these are increasing in price beyond what I would consider to be entry level for someone who just wants to dip a
toe into the RC Racing water to see if they like it.
Hence this project. To see just how cheaply I can get a competetive Touring Car on the track.
Entry level chassis, typically cut costs by replacing the expensive materials with cheaper ones.
- Alloy with plastic
- Carbon fibre with GRP (Glass Reinforced Plastic)
This can work with lower powered models, but I have found in the past that these chassis cannot quite cope with the stresses
imposed by a 13.5 boosted motor.
Consequently, I am targeting our 17.5 "blinky" class.
This class is fractionally faster than the old 27 turn brushed stock class, and provides a precision driving challenge for experienced drivers,
while speeds are kept down to something suitable for beginners to learn racecraft without expensive crashes every race.
Project Principles
- Keep the costs to a minimum
- Keep complex modifications to a minimum. preferably not at all.
- Avoid the use of custom made parts
- Produce a working baseline setup, and list of parts and prices required to build it.
- Win a sportsman stock 17.5 "blinky" race with it.
The 3-Racing Sakura Zero-S
This kit was chosen because it is by far the cheapest on the market where the kit still resembles a "proper" race car in design and construction.
At the time of writing, in March 2013, they are available on ebay for around Ł80, but prices vary with currency movements.
Research
After selecting the Sakura Zero-S as the target chassis, it was time to do some research.
It quickly became clear that there probably isn't an "out of the box" Zero-S on the planet!
The "S" is 100% parts compatible with the non-S variant, and people like to upgrade, so every reference I found to the Zero-S had at least one modification made to the standard car, and normally... many.
This defeated the object for me. Why buy the S variant if you are going to turn it into the full spec. car?
My task became clear. I have to sort the wheat from the chaff, and discover which of the upgrades are essential for racing, and which can be dispensed with.
Some useful, some thought provoking, some contradictory. And I'm sure I've missed a lot.
- Use the Vertical Motor mMunt to solve for access to the rear motor screw when running small or alternative spur gears.
- Stock top deck gives too much flex. SAK-S16/WO, the Carbon fibre top deck is stiffer.
- The supplied Servo saver has some slop. Replace with Tamiya or Kimbrough
- Some like the Tamiya TRF or 3-Racing threaded shocks for easier ride-height adjustment.
- Xray T2 c-hubs will fit, but are not a direct match so need to be replaced in pairs.
- If you flip the belts, (to fit the vertical motor mount), and remove the kit battery mounts, (and use battery tape), rather than modify them, then the battery is VERY close to the belt.
Some use two 3 Racing cyclone belt tensioners fitted to the stock bottom chassis to hold the battery clear.
- There are many recommendations for the Alloy bulkhead covers to reduce chassis flex.
- Tamiya ball diffs will fit in the back, but it's not clear which model.
- Tamiya driveshafts will fit.
- The plastic bulkead covers can deform and put pressure on the diff bearings.
Some suggest using 0.3mm shims under the covers to ease the pressure on the bearings.
- The front belt can rub against the chassis under the diff, Some people lengthen the clearance hole with some judicious filing.
- A common spring choice is Tamiya whites (17.24 lb) in the front and Tamiya blue (15.27 lb) in the rear.
- The oversteer Problem. Suggestions.
- Stand up the rear shocks
- Increase rear toe-in to 3.0
- Using narrow rear suspension blocks to narrow the rear track-width
- Use Sakura XI rear arms to narrow the rear track-width
- Reduce front camber
- Increase rear camber (to 2.0)
- Increase Camber gain, (the increase in camber when the car rolls), by using shorter rear camber links, (and inner hole on rear uprights).
- Lower the roll center (and increase rear camber gain), with a 1mm spacer under the rear, inner, camber link ball stud.
- Adding .5mm shim under rear suspension blocks (raises inner wishbone mounting points, and therefore raises rear roll center)
Common upgrades
| Modification |
Part no. |
Reason |
Discussion |
Y/N |
| Vertical motor mount |
SAK-66/V2/PK |
To allow for the use of different/smaller spur gears, and still allow for the motor to be tightened |
Expense.
There is a workaround with the supplied mount.
The Vertical Motor Mount itself requires modification |
N |
| Alloy wheel hexes |
3RAC-WX125/PK |
To avoid crushing of the wheel bearings and consequent drive train losses and handling problems. |
Essential.
I used some spare 5mm xray ones I had in my parts box, |
Y |
Alloy spur gear mount
and 19T pulleys |
SAK-05
SAK-06
SAK-07A
|
To ...
- Ease tension on overtight belts
- Replace soft plastic pulleys with something more durable
- Allow changes to the internal gear ratio
- Cure spur gear wobble
|
I wasn't happy with the look of the supplied pulley, so invested in this mod, which everyone seems to recommend. |
Y |
| Threaded alloy shocks |
SAK-48/PK |
To minimise leaks
To allow finer ride height adjustment
Convenience |
The standard shocks supplied with the kit seem OK, and there are no reports of leaking, (with correctly built shocks)
As the ride height will be set on rubber tyres, once adjusted, they should need minimal adjustment |
N |
| Race belts |
SAK-11
SAK-12
|
Smoother transmission |
The transmission with the standard out of the box belts seems plenty smooth to me. maybe I'll upgrade when they wear out. |
N |
| Ball diff for the rear |
SAK-01
SAK-02
SAK-03
416-10A
416-10F
3RB-B30
2 of M5x8x2.5 bearings
|
Tradition, comfort, reduced "punch", cure leaks, etc |
Buying all of the relevant parts is expensive. The car was provided with a gear diff...
many people upgrade to a gear diff, let's stick with a gear diff. |
N |
| Spring kit |
SAK-49 |
Variety of springs to try |
At $30, (Circa Ł20), these are relatively cheap for a selection of 9 different pairs, although they are mostly too stiff to be of use to a tarmac racer.
- M1.5 x 21 (4.25)
- M1.5 x 21 (4.50)
- M1.5 x 21 (4.75)
- M1.5 x 21 (5.0)
- M1.5 x 21 (5.25)
- M1.5 x 21 (5.50)
- M1.5 x 21 (5.75)
- M1.5 x 21 (6.0)
- M1.5 x 21 (6.5)
However, I'll try other avenues before commiting to spending money.
|
N |
| Sakura XI rear arms |
SAK-X01 |
Narrows the rear track width |
This is touted as being THE modification to calm the wayward rear end |
Y Probably |
| Spool for the front |
SAK-08/PK
SAK-09/PK
SAK-02
|
Gear diff front is not "traditional.
Gear diffs can leak |
Possibly in future. although when you add up all of the required parts, it is not as cheap as it could be. |
N |
Build observations
Overall, the parts are well made and go together well, with no filing or reaming required to make parts fit where thay ought to go.
The build quality is not up to the top level kits such as the Xray T4 or Hot-Bodies Cyclone, but is more than adequate for such a competetively priced car.
The bearings supplied in the kit are not very high quality, and packed with grease.
I't is worthwhile washing out the grease with motor spray, and re-lubing with a light bearing oil, or even some standard 3-in-1.
It's a heavy car. With my Nanotech 6000may battery weighing 320g, the total ready to race weight of the car is 1540g
There is little scope for losing weight on the car, so we need to find lightweight shell, servo and battery to make a difference.
The "Stubby" 4200mah Turnigy-Nanotech lipos from Hobbyking weighing 190g gets us nearly all the way.
Some further areas deserve more comment.
Turnbuckles
The steel turnbuckles supplied have a srange sized adjuster hex. 3mm and 4mm spanners don't fit, and there is no tool in the kit which fits either.
You will be adjusting these with pliers, and as the steel is close to swiss cheese in consitency, they will round off petty quickly.
Screws into plastic
The plasic is quite tough. The screws are supposed to self-tap as you screw them in, but you will find that they build up friction heat quite dramtically.
The heat will melt the thread.
You either need to take a break to allow the part to cool, or use a 3mm bottom tap to pre-thread the holes.
I have seen recommended the use of grease to aid cooling and thread cutting, but I am averse to putting lubricant into a hole which is supposed to create a fastening.
I took cooling breaks when building, but not until I had destroyed the thread in two of the bulkhead topdeck mounting holes.
Spur gear, motor and pinion
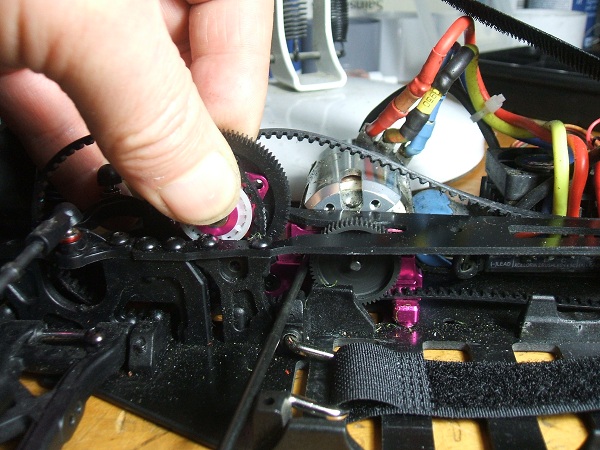 There is an 80 tooth 48 pitch spur gear provided with the kit.
For a 17.5BL motor running blinky on the full AMCC track, I want to gear the car with a FDR of 3.1:1
I have already reduced the center pullies to 19 tooth, giving an internal ration of 2.0:1, so I require a spur/pinion of 92/59, to give me the FDR I want.
The supplied spur gear has holes through it, (as many other spur gears do), to allow for a hex driver to go through it and tighten the rear motor screw, with the supplied horizontal motor mount.
As spur gears get smaller, they tend not to have holes drilled through them, which makes tightening the rear moor mount screw a problem.
My 92 tooth spur gear has no holes, and even if it did, they would be in the wrong place. The rear motor mount screw is directly befind the gear mesh.
Most racers solve this problem with the vertical motor mount, but for a variety of reasons, I didn't end up going this route.
So how can we mount the motor using the horizontal motor mount when we require a big pinion and small spur gear?
- Build the car with the small spur gear.
- Mount the motor and pinion, and set the gear mesh using the front screw only.
- Remove the rear diff to slacken the rear belt.
- Remove the center pulley assembly
- Insert and tighten the rear motor mount screw
- Reassemble center pulleys
- CHECK THE MESH, and repeat procedure untill correct.
- Re-fit rear diff.
It is time consuming, and you won't want to change pinions at the trackside, but it has the advantage of keeping to cost reduction and not modding principles.
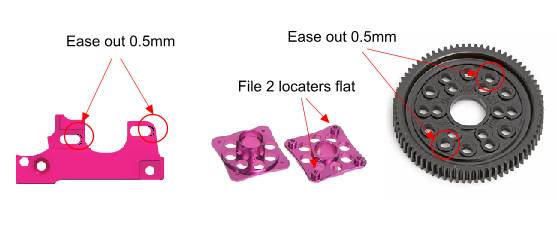 The spur gear supplied seems to have an odd hole arangement. My existing spur gears, (Robinson, RW, and Kimbough), don't fit onto the 3-racing spur gear mount.
My solution was to
- Dremel two of the 4 mounting lugs off the alloy spur gear mount. (I wouldn't do this with the plastic mount... it seems too flimsy)
- Gently file the holes in the selected Kimbrough spur gear until the remaining two lugs fitted. Only about 0.25mm
The 59 tooth pinion was slightly too big to mesh with the 92 tooth spur.
Filing, (with a small rats tail file), the motor adjustment slots on the horizontal motor mount to open them up by a further .5mm solved the problem.
Shocks and springs
The shocks/dampers are shorter than Xray/HB/Tamiya shocks, being pretty much the same construction and dimensions as the 3-Racing Mini M03/M05 items.
This means the springs are also shorter, and we can't simply dig into the parts box for known spring sizes.
All four springs are marked with 5.5T, indicating that they are all the same, and not much more.
Comparative spring tests using the entirely unscientific test of compressing them end to end, and seeing which ones get coilbound first, produced the following empiric results.
- Kit Sakura shocks (T5.5), are harder than Xray White (17.5lb), similar to Xray blue (22.5lb)
- YEAH M03 mini springs are far too soft.
- Most of the 3-racing mni springs are too soft. except for the "extra stiff" silvers. and are the same length @ 21mm
- The mini-silvers are approx similar to xray whites.
- If I run the Sakura std on the front, then I need softer on the rear. Use the 3-acing mini-silvers
- ... so it will be approx 22.5 front and 17.5 rear.
Subsequently I found a list of Sakura spring rates which someone had made from testing on a spring rig.
- 4.25T - 35.8 lb/in
- 4.5T - 31.7 lb/in
- 4.75T - 29.2 lb/in
- 5.0T - 26.2 lb/in
- 5.25T - 24.9 lb/in
- 5.50T - 22.9 lb/in
- 5.75T - 21.2 lb/in
- 6.0T - 20.0 lb/in
- 6.5T - 17.9 lb/in
Oils and greases
The Sakura Zero-S has gear diffs front and rear.
Normally, you would expect to have different oils for the front and the rear, but 3-Racing only supply one bottle of 2000wt silicon oil for both diffs.
The 3-Racing online tutorial on how to build a perfect diff, recomends the use of Antiwear Grease, to help seal the o-rings. Again, there is none provided.
I used some Serpent Diff grease I had in my parts box, which semed to do the job.
The vertical motor mount problem.
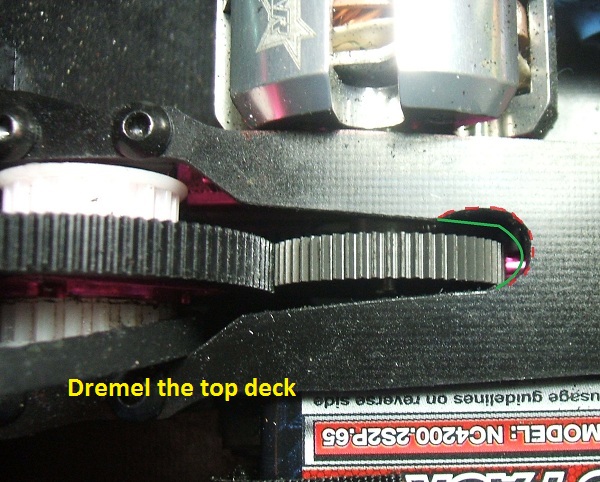 The vertical motor mount provides motor mount screw locations top and bottom instead of side to side.
This deals with the issue of small pinions and allows for easy pinion and mesh adjustments.
The vertical motor mount provides motor mount screw locations top and bottom instead of side to side.
This deals with the issue of small pinions and allows for easy pinion and mesh adjustments.
It adoes require some modifications.
You must flip the diffs and belts to the opposite side of stock, grind the top deck for clearance of the mount,
(or buy and fit the carbon top deck), and either grind or remove the inboard battery locators to clear the front belt.
I did buy a vertical motor mount, but ended up not using it. Because...
- Cost : It went against the principle of keeping the cost down.
- It required modifications to the car.
- Filing or dremelling the top deck.
- Diff/Belt flipping, leading to
- Filing or dremeling the battery mounts
- The Vertical Motor Mount itself requires modification to allow for big pinions.
Nothwithstanding these reservations, I will be trial fitting it at a later date, although as standard it will not accomodate anything larger than at 35T 48 pitch pinion.
I'm not sure that even with grinding some of the alloy away, I will be able to fit the 57T 64 pitch pinion I have on the car now.
The "Tail Happy Zero" problem.
Some basic research on the zero-s immediately turns up an intrinsic oversteer problem with the car.
In looking at the "out of the box" setup, some areas leap out as being unusual based on experience.
- Gear Diffs front and rear
- The same oil in the gear diffs front and rear
- The Same weight oil in the shocks front and rear
- The same springs on the shocks front and rear
There is much advice on the RC-Tech forum thread
on what to do to cure the problem.
Nonetheless, I resolved to race the car near standard to test for myself.
Race Date 10th March 2013
Setup
- Ccamber; front - 2*, rear 2*
- Toe; front 3* out, rear 2* in
- Caster; std kit
- Rear = 1 degree tilted fwd at the top
- Front 2 degrees tilted back at the top
- Ride height; 5mm front, 5mm rear.
- Downstop: front 5, rear 0
- Droop: front 5 mm, rear 6 mm
- Roll Centers
- Rear : Stock
- Front : Stock
- Shock settings; front no. 2 hole, rear no. 2 hole.
- Gear diff front and rear with kit 2000 oil in both.
- Shock piston; 3 hole front and rear.
- Shock oil; 3-Racing Kit front and rear.
- Springs; front 3 racing T5.5, rear 3 racing T5.5.
- Spur; 92
- Pinion; 57
- FDR; 3.23
- Pulleys; std kit = 38t front and rear with non-std 19t centre = ir 2.0.
- Wheels and tyres; Take Off CS22
Set up like this, the car was almost undrivable, with the back fishtailing all over the place.
In the second race, the car oversteered into a track barrier on the fastest bend of the track and wiped out the front corner, breaking the wishbone.
Race Date 24th March 2013
I have changed the shock springs, and oils, and altered the rear roll center.
The replacement front wishbones are Sakura XI, which are approx 1mm shorter than standard, giving a reduced track width at the front.
Setup
- Camber; front - 2*, rear 2*
- Toe; front 3* out, rear 2* in
- Caster; std kit
- Rear = 1 degree tilted fwd at the top
- Front 2 degrees tilted back at the top
- Ride height; 5mm front, 5mm rear.
- Downstop: front 5, rear 0
- Droop: front 5 mm, rear 6 mm
- Roll Centers
- Rear : 1mm under Inner top camber link. (Lowers Roll Center)
- Front : Stock
- Shock settings; front no. 2 hole, rear no. 2 hole.
- Gear diff front and rear with kit 2000 oil in both.
- Shock piston; 3 hole front and rear.
- Shock oil
- Rear : AE 30wt
- Front : AE 40wt
- Springs
- Rear : 3 racing M03 spring Silver (Extra stiff)
- Front : 3 racing T5.5 (std kit)
- Spur; 92
- Pinion; 59
- FDR; 3.12
- Pulleys; std kit = 38t front and rear with non-std 19t centre = ir 2.0.
- Wheels and tyres; Take Off CS22
The car was more drivable than before, but still suffered from oversteer.
Throughout the day, I progressively made the following changes...
- Change to still softer shock springs on rear. 3-Racing M03 spring blue(stiff)
- Lay down rear shocks 2 holes
- Increase front droop by 2mm
With these changes it's much more drivable... smooth even, but still oversteering under power, on corner exit.
On returning home, I find that the wheels are binding.
i.e. the plasic wheel hexes are deforming under pressure when the wheel nuts are tightened down, and pressing on the wheel bearings.
Each wheel is therefore applying a different amount of drag to the chassis.
At best this will slow the car down, and produce unpredictable handling charactersitics.
The rear gear diff was also leaking drastically, and when opened, proved to have no oil in it.
Todays testing has been largely wasted. I need to cure the wheel binding and revert to a more standard setup for the next race date.
Race Date 21st April 2013
I have fitted alloy wheel hexes all round.
- Rear : 5mm Xray hexes
- Front, 5.5mm 3-Racing hexes (from my M03 mini) (to compensate for reduced track width of the XI wishbones)
The rear gear diff has been rebuilt with grease sealed O-Rings, and filled with 80wt Schumacher shock oil.
... and reverted some of the changes I made before, to a more out of the box baseline.
Setup
- Track width
- Rear = Standard Zero-S wishbones to start the day, with 5mm wheel hex. (Change to narrower SAKURA XI Wishbones after race 1.)
- Front = Narrower SAKURA XI Wishbones, 5.5mm wheel hex, giving 1mm wider track at the front.
- Camber; front - 2*, rear 2*
- Toe; front 3* out, rear 2* in
- Caster; std kit
- Rear = 1 degree tilted fwd at the top
- Front 2 degrees tilted back at the top
- Ride height; 5mm front, 5mm rear.
- Downstop: front 5, rear 0
- Droop: front 5 mm, rear 6 mm
- Roll Centers
- Rear : Stock
- Front : Stock
- Shock settings; front no. 2 hole, rear no. 4 hole.
- Gear diff front and rear with kit 2000 oil in front and Schumacher 80wt in rear.
- Shock piston; 3 hole front and rear.
- Shock oil
- Rear : AE 30wt
- Front : AE 40wt
- Springs
- Rear : 3 racing M03 spring Silver (Extra stiff)
- Front : 3 racing T5.5 (std kit)
- Spur; 92
- Pinion; 59
- FDR; 3.12
- Pulleys; std kit = 38t front and rear with non-std 19t centre = ir 2.0.
- Wheels and tyres; Take Off CS22
Throughout the course of the day, (if the oversteer problem persists), I will try the following changes...
- Fit the narrower Sakura XI rear wishbones
- Fit the 3* rear toe in block
- Increase front droop by 1mm (downstops to 4)
- Change to softer shock springs on rear. 3-Racing M03 spring blue(stiff)
- Lay down rear shocks to 6th hole
On the day
Track conditions were not ideal for testing, being dusty and washed clean by extensive rain since the last meeting. Low grip.
To recap... the problem at hand is massive oversteer on corner exit, when power is applied.
-
Race 1: is clear it isn't handling as well as the other cars on the track.
Changes made after race...
- Replace OE rear wishbones with X1 shorter/narrow wishbones
- Lengthen wheelbase by 2mm.
- Add droop (half turn anti-clockwise of screw) to front.
- cannot fit the 3 degree toe in block due to a rounded off allen screw
-
Race 2: was missed due to problems setting up my other car.
-
Race 3: No discernable improvement BUT...
I HAD FORGOTTEN TO ADJUST the top camber links after narrowing the track width at the rear, resulting in the rear wheels tilting out with +2 camber.
Changes made after race...
- Adjust camber back to -2 degrees.
- Put 2mm spacers under rear OUTER camber link
-
Race 4: Almost drivable. when it goes, it snaps round dramatically though.
Changes made after race...
- change to softer springs on rear. (3-racing M03 "stiff" blue)
- Add another quarter turn anti-clockwise of droop to the front.
- Remove 2 front topdeck screws to allow more flex.
-
Finals: Drivable with care. It is by no means "planted" though.
Reading these changes back, it appears I became a little confused.
Adding spacers under the rear outer camber link positions RAISES the rear roll center. the opposite of what I wanted.
I'll rectify this for the next testing at the Tuesday evening meeting of April 30th.
With this in mind, the front droop may now be excessive, but I'll run with it as it stands for the next tests.
Race Date 30th April 2013
I have changed the camber link settings to lower the rear roll center, by removing the erroniously fitted outer shims, and adding a 1mm spacer under the rear INNER camber link mounts.
I have also changed the track width settings to be more measurable and consistent.
- Front and Rear : 5mm Xray hexes
- Front, 1mm shim between the hex and the wheel.
This results in a 2mm wider track width at the front than at the back.
Additionally, I have fitted the 3* rear toe in block which I wanted to try at the last meeting but couldn't due to a rounded allen bolt.
The gear diffs have been checked, and have no discernable leaks now.
Setup
- Track width
- Rear = Narrower SAKURA XI Wishbones , 5mm wheel hex.
- Front = Narrower SAKURA XI Wishbones, 5mm wheel hex, 1mm wheel shim, giving 2mm wider track at the front.
- Camber; front - 2*, rear 2*
- Toe; front 3* out, rear 3* in
- Caster; std kit
- Rear = 1 degree tilted fwd at the top
- Front 2 degrees tilted back at the top
- Ride height; 5mm front, 5mm rear.
- Downstop: front 2, rear 0
- Droop: front 8 mm, rear 6 mm
- Roll Centers
- Rear : Lowered with imm spacer under INNER camber link mount.
- Front : Stock
- Shock settings; front no. 2 hole, rear no. 4 hole.
- Gear diff front and rear with kit 2000 oil in front and Schumacher 80wt in rear.
- Shock piston; 3 hole front and rear.
- Shock oil
- Rear : AE 30wt
- Front : AE 40wt
- Springs
- Rear : 3 racing M03 spring Blue (Stiff)
- Front : 3 racing T5.5 (std kit)
- Spur; 92
- Pinion; 59
- FDR; 3.12
- Pulleys; std kit = 38t front and rear with non-std 19t centre = ir 2.0.
- Wheels and tyres; Take Off CS22
Throughout the course of the evening, (if the oversteer problem persists), I will try the following changes...
- Lower the rear roll Center further by by raising the INNER rear camber link mounting another 1mm to make 2mm total.
- Raise the Front roll Center by raising the OUTER front camber link mounting
- Try some pro squat. Rear wishbone hinge pins angled higher at the rear by adding 1mm spacers between the rear toe block and the chassis.
- Lay down rear shocks to 6th hole
On the day
At last some positive changes.
Lowering the rear roll center, and changing the rear toe in to 3 degrees has resulted in a far more stable car.
It is still nervous at the back, and I can't get the power on as early as I'd like on corner exit which is costing me, I suspect, circa 1.5 seconds a lap.
On the occasions I was lulled into driving it "naturally", it still bit back and oversteered, but not as dramatically as before.
i.e., it would oversteer, but not spin out, as it had been.
One side effect has been that there is now a reduced amount of on power steering, noticable on fast sweepers... But, it's managable, so lets nail the back down before looking at that.
In race 2, I lowered the rear roll center some more, by adding another 1mm spacer under the rear INNER camber link ball studs.
However, there was only 2mm of thread left on the ball stud, and given the softness of the plastic it was screwed into, I though there might be a problem
This proved to be the case. The first brush I had with another car, dislodged the right camber link, pulling the ball stud out of the plastic bulkhead top.
The dogbone dissapeared into the grass, never to be seen again, and the evenings racing was over.
The plastic bulkhead tops are quite bendy. I was surprised at the amount of flex I noticed in them when I was adding the spacers.
They are definitely a candidate for replacement, as the amount of flex I was seeing, perhaps up to a millimeter of deflection, would change the camber, and camber rise dynamically under cornering stresses.
For the moment though, I will try and source some longer ball studs, and go again at the weekend.
Race Date 5th May 2013
I have repaired the rear camber links by using longer threaded ball studs, retaining the 2mm spacers to lower the roll center.
I've also added 1mm spacers under the front OUTER camber link mounts to raise the front roll center.
Hopefully this won't rob me of too much on power steering.
I've also noticed I have 3 degrees of toe out on the front. I think this is too much, so have reduced it to 1.5 degrees.
This should also help to deal with the oversteer on corner exit, and may even be a contributory cause.
The missing driveshaft dogbone has been replaced with some parts I had in the misc. spares box, namely some Alloy Tamiya 46mm CVD shafts fitted to some 3-Racing axles.
Setup
- Track width
- Rear = Narrower SAKURA XI Wishbones , 5mm wheel hex.
- Front = Narrower SAKURA XI Wishbones, 5mm wheel hex, 1mm wheel shim, giving 2mm wider track at the front.
- Camber; front - 2*, rear 2*
- Toe; front 1.5* out, rear 3* in
- Caster; std kit
- Rear = 1 degree tilted fwd at the top
- Front 2 degrees tilted back at the top
- Ride height; 5mm front, 5mm rear.
- Downstop: front 2, rear 0
- Droop: front 8 mm, rear 6 mm
- Roll Centers
- Rear : Lowered with 2mm spacer under INNER camber link mount.
- Front : Raised with 1mm spacer under OUTER camber link mount.
- Shock settings; front no. 2 hole, rear no. 4 hole.
- Gear diff front and rear with kit 2000 oil in front and Schumacher 80wt in rear.
- Shock piston; 3 hole front and rear.
- Shock oil
- Rear : AE 30wt
- Front : AE 40wt
- Springs
- Rear : 3 racing M03 spring Blue (Stiff)
- Front : 3 racing T5.5 (std kit)
- Spur; 92
- Pinion; 59
- FDR; 3.12
- Pulleys; std kit = 38t front and rear with non-std 19t centre = ir 2.0.
- Wheels and tyres; Take Off CS22
Throughout the course of the day, (if the oversteer problem persists), I will try the following changes...
- Raise the Front roll Center by raising the OUTER front camber link mounting
- Try some pro squat. Rear wishbone hinge pins angled higher at the rear by adding 1mm spacers between the rear toe block and the chassis.
- Lay down rear shocks to 6th hole
On the day
So to summarise the journey so far, we have made some mistakes, crashed a bit, broken some parts, and made some small improvements
to what is effectively, a car which is undrivable out of the box.
Todays mission is to turn it from a skittish, slightly tail happy, "on the edge" car, into somthing which I'd be happy to hand over
to a beginner to try.
That means getting the back end planted.
The problem is we are running out of things to try.
-
Practice.
I still have a bit of oversteer on corner exit, PLUS, I now have a little oversteer on off power corner entry.
This is only noticable on one corner, but as a handling issue, it is potentially more serios than the corner exit understeer.
I can drive slowly out of a corner and control the oversteer, but if I cant get into the corner to start with, then it's game over.
Changes made after practice
- Change to a heavier battery in an attempt to increase the weight transfer to the back.
- Just in case the corner entry thing is caused by my GT shell, change to a Touring Car shell.
- Increase rear camber to 3 degrees.
-
Race 1:
The chages I made after practice have had no effect at all. I have oversteer problems off power corner entry, and on power corner exit.
Changes made after race...
- Swap back to GT shell (It looks nicer)
- Swap back to shorty battery, (and drop 130g of weight)
- Add 1mm spacers under the front camber link OUTER, to raise front roll center a little.
-
Race 2:
A very ordinary brush with another car resulted in the Left Hand Side rear hub carrier shattering.
I have no spares for this part, but I recall reading that many of the parts are similar to Xray.
Digging around in my Xray parts box, I find a pair of standar rear hub carriers from an Xray T2, marked 2 degrees.
They are a perfect fit in the sakura rear arms, requiring only a minimum of adjustment on the camber links to return the camber to 3 degrees.
However, I'm going to try something different, so I shorten the camber links and mount the outer link to the inner hole of the two on top of the hub carriers.
Theory says this gives me more camber rise, i.e. the more the car rolls, the more the camber changes.
I did this because I noticed that using the iner mounting holes on the rear hub carriers is the standard setup on an xray.
The only other thing of note is that the Sakura rear hub carriers, while unmarked, are 3 degree.
Changing to the Xray items has reduced the rear toe in from 3 degrees to 2 degrees.
Without a non standard 4 degree rear toe block, there is nothing I can do about this at the track.
This does worry me becase changing from 2 to 3 degrees rear toe in was one of the big wins.
In summary... Changes made after race...
- Shorten rear camber links to give more camber rise
- Change back to 2 degrees rear camber
- Inadvertently reduce rear toe in, from 3 to 2 degrees.
-
Race 3: No discernable improvement
Running out of things to try.
Changes made after race...
- Adjust Rear camber to -3.5 degrees.
- Raise front ride height by 1mm, (Giving 6mm front and 4.5mm rear)
-
Race 4: On the first hairpin, it snaps round dramatically, breaking the front left wishbone mounts.
Changes made after race...
- Throw the car into the pit bag with a degree of violence
- Make decision that, at least the first part of this project is over.
- Go home and sulk.
-
Finals: Missed.
Conclusion
This part of the Sakura project is now over.
I have invested 5 race meetings in attempting to set this car up, and have only made minimal progress.
Following the progress of Sakura Zero-S drivers asking questions on the internet forums is instructive. The answers from drivers
who presumably HAVE got the car working, invariably entail buying new parts, or modifying the car.
While I'd like to try some of these ideas, they stray too far from what this project set out to achieve.
I set out with a number of parameters and objectives...
- Keep the costs to a minimum
- Keep complex modifications to a minimum. preferably not at all.
- Avoid the use of custom made parts
- Produce a working baseline setup, and list of parts and prices required to build it.
- Win a sportsman stock 17.5 "blinky" race with it.
...but failed to achieve 4 and 5.
The next steps are going to require more investment of money, and time.
Handling and setup
I think that I need to eliminate the flex in the car, which will entail spending at least Ł40, (Forty UK Pounds), on alloy upgrade parts.
While this isn't a huge amount of money compared with the price of spares for Xray, Hot bodies, Schumacher,
it moves us further away from the original brief... to find an inexpensive touring car which can be recommended to a beginner.
I am also begining to suspect the shocks.
Not because they are short,
or because they are plastic,
or because they have an unusual mount at the rear,
or because they are unthreaded...
...but because many of the problems I am experiencing, I recall having in the past, and solutions being down to shocks and damping.
I feel a need to move to standard length shocks, where I can try spring combinations I am familiar with.
This will entail buying non standard and/or upgrade parts to modify the car to accept them, again moving us away from the design brief.
Quality and Value for Money
I know I have been struggling with the handling, and have crashed the car on a number of occasions, but in 4 race meetings, I have broken more on this car than I have in 4 years of racing an Xray.
The plastic mouldings, look acceptable on the surface, but when inspecting the broken parts, tiny bubbles are visible in the broken surfaces.
The parts are cheap, true, but you will need more of them, and what price an unfinished race.
It is unclear whether this malaise affects just the Zero-S parts, or the upgrade Zero (standard), parts which I have fitted.
None of the upgrade plastics have failed yet, but the sample size is too small, (just me, less than 20 races), to decide.
The bulkhead plastics are too soft. This gives rise to two problems.
- It allows too much flex in suspension parts bolted to them, far more than in the equivalent plastic Xray "R" series, or the Hot Bodies "S" series cars.
- The threads fail in the screw holes, either when first creating the thread, or after only one or two times the screw is removed/replaced.
Finally, the allen screws provided with the car, are not very good quality.
Initially, it was a relief to see allen headed screws instead of the Phillips crossheads provided with similar entry level cars.
However, screwhead after screwhead rounded off, in most cases requiring dremmel based surgery to remove.
If I were building again, I'd start by throwing all the screws away, and sourcing after market replacements.
Recommendation
I cannot recomend this car as a cheap entry level touring car for a beginner.
They would be far better off buying a quality second hand car.
- Parts are more expensive, but you will need less of them.
- There will lilely be more people to help at the track for setup and spares.
Next Steps, Longer Term, what happens to the car now?
I'm not sure what I'll do with the car now.
It needs repair again, so will cost money just to return it to it's non handling state, and will require further investment if I want to proceed with it as a viable racing car.
I could sell it, but after reading this... who will buy it?
If I was to keep it, then for a longer term car, there are some things which will have to change to make it easier to live with and maintain, and may even make it easier to drive.
- The plastic bulkheads, both front and rear, strip out threads too easily, and will be upgraded to alloy
- The plastic bulkead diff covers flex too much and will be upgraded to alloy
- the rear shock tower flexes too much and needs to be modified by
- using FRONT bulkhead cover (which has a shock tower mount), instead of rear.
- using a carbon fibre shock tower from Xray, Tamiya... whatever's in the box and will fit with a minimum of filing.
- Fit the vertical motor mount, which will require a LOT of filing of the mount
to allow for the size of pinions I need for 17.5 blinky, and some modification of the drive train and battery mounts.
- Replace the swiss cheese turnbuckles with something better. Lunsford titanium, 3-racing titanium, Hudy spring steel, whatever is available at a reasonable price.
Shopping list
I'm not going to provide links here, as the 'net changes so rapidly.
The costs are averaged from the 3 cheapest options I could find for the item and converted from Dollar to Sterling if required using the appropriate rate as at April 2013.
Costs dont include postage, or any possible import duty you may incur.
So the costs don't represent a hard and fast budget, so much as guidance on the relative expense, which you can compare to other brands, and other options.
Essential upgrades
Nice to haves/Maybe later
| Part |
Part no. |
Av.Price Ł |
| Vertical motor mount |
SAK-66/V2/PK |
Ł10.50 |
Resources