How to build a race wining Tamiya Mini
Or... Everything I think I know about minis...
With the recent theft of my mini, I have an oportunty to start again, and maybe improve on what I had before.
The problem is, I dont think there was much wrong with the old setup. In fact, on it's last outing, before being so
cruelly nicked from me, it set a new track record for the mini class.
However, if I want to continue driving the most fun class I've experienced in 8 years of racing, I need to build again.
Research
So the first thing I need to work out is which type of mini to buy.
HPI or Tamiya?
There's a HPI mini?
Yes, but apparently,
it's not very good. So Tamiya then...
Traditional M03, Newer M05, or perhaps wait for the new M06?
Well the M06 may be the bees knees, but it's new, unproven, and not on the rules of any club yet, so that narrows the field.
Additionally, the M06, and M04 before it, ar rear motor mount, rear wheel drive cars, and as such are never likely to fit into the rules for a traditional Mini class.
The M03 is older, but proven, and slightly cheaper. Its not discontinued, so parts are still available, and I know how to build one.
The M05 has some advantages though. It's built to get the weight lower in the car to aid cornering.
Ummm, that's more or less it as far as advantages go.
Against that are the reports of experienced M03 drivers taking time to "learn" the m05 setup,
the fact that it can be "stiff" and need breaking in, The vagueness of the steering caused by the extra linkages between servo and wheels,
and of course, it is a bit more expensive.
I'll have an M03 please. So which M03 shall I have.
Beg pardon?
Well, there are lots of variants, and it's not just the different shells available.
To start with there are three different wheelbase lengths, short, medium and long.
That explains the M03, (short 210mm), M03M, (medium 225mm), and M03L, (long 239mm), designations, each length of chassis has
a selection of shells which can fit.
If you later want to use a different shell, you can alter the length of the chassis by removing an extender in the middle of the chassis to
make a short wheelbase mini, or inserting a medium or long insert at a cost of about £10 for the part.
(The M05 kits and the M03L Mini Cooper S kit have all the parts to make the car any of the 3 lengths are included in the base kit)
Is there any difference in handling between the three lengths?
I've driven all three, and they all "feel" the same to me on the track. There may be differences... I'm not a good enough driver to discern them.
 There are other differences between the models as well.
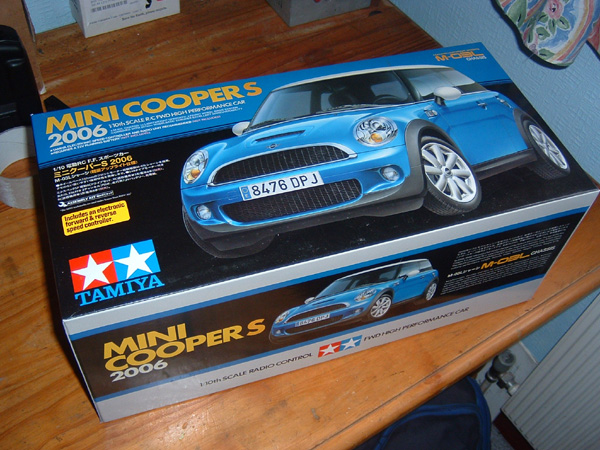
Notably, the M03L Mini Cooper S, and the M03M kits, (the Suzuki Swift, and Fiat 500), come with wheel bearings as standard, instead of the plastic bushes
which Tamiya like to provide. They still have no bearings in the kit for the gearbox though, which you need to source elsewhere.
Both of these kits also have 2 degree toe in on the rear wheels,
(instead of 0 degree, or no toe in at all), and lightweight front steering uprights.
This means that these kits have different, smaller, wheel bearings to the others.
Something to bear in mind when ordering spare parts, or upgrading the steering parts to alloy, as all
the alloy steering block upgrades are designed for the older, larger wheel bearing.
The currently available M03 kit part numbers are
| Name |
Code |
Wheelbase |
| TAMIYA MINI COOPER S - M-03L |
58400 |
Long |
| ROVER MINI COOPER M03 58211 |
58211 |
Short |
| Suzuki Super Swift 1600 M03-M |
58368 |
Medium |
| Fiat 500 M-03M |
58427 |
Medium |
There are older versions of these same kits, with different part numbers, and slightly different contents.
Some don't comne with an ESC, some come with plastic bushes instead of wheel bearings.
As far as I can make out, all the currently available kits listed above come with the Tamiya TEU-101BK ESC, and wheel bearings.
None come with the internal gearbox bearings required.
Hop ups
Essential
Tamiya themselves, 3-racing, and other manufacturers make vast quantities of hop ups and improved parts for the M-chassis cars.
Most of them are really not needed, and are just so much bling.
The upgrade parts I consider essential are
- Bearings. All wheels, (provided with some kits), and all gearbox.
- Tyres - The kit tyres work OK, but are limited.
- Alloy Steering uprights - The kit plastic ones are the biggest cause of imprecise steering, and inability to
center the steering
- Motor - Tamiya "black can" race tuned motor revs higher than a standard silver can, and goes faster.
- Shocks - Kit shocks in the M03 cars are friction damped. You need oil filled shocks for consistent cornering.
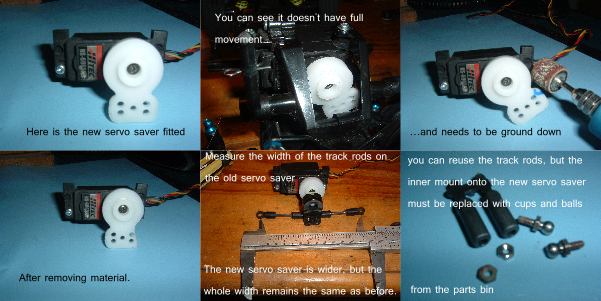
- Alternative Servo Saver: The Tamiya one is a part bin special from another model, and isn't quite the right size.
It also has a tendency to stick, and therefore not center the steering properly.
I have also had one fail on me.
I have used both the Trick Bits "large gas car" servo saver, part no TB3007, and also, the all but identical, Traxas Large Servo Saver, Partno TRX1844.
It's the right size to operate the steering correctly without having the steering linkage bounce off the chassis as the standard saver does.
If using this part, you'll need to shave the width of the plastic down on the left hand side to clear the chassis.
You'll see what I mean as soon as you mount it in the car, but here are some pictures anyway.
Also consider
- Different weights of springs to try on the shocks. It can be econmomic to buy a "spring pack".
- Hardened 20T pinion gear. : The kit one wears out quite quickly, which makes a noise and robs your car of vital mph. Code 53509
- Ball diff. The planetary diff works just fine, but if you must have a ball diff, (Some people think it makes the car easier to drive), get the TA03 diff (part 53267). The Manta Ray Diff fits and works but is fragile.
- LiPo battery - Delivers slightly higher and more consistent current. Although I set the track record with a
3300 NiMh battery. Go Figure.
- Universal Joints (UJs), for the front wheel drive shafts replacing the standard dogbones. They are undoubtedly smoother, and won't fall out on the track, but I have seen no evidence of improved lap times.
Dont bother with
- The heat sink motor mount - it doesn't work.
- Expensive Tamiya Metal Shocks - The Tamiya plastic ones work fine. I'll let you know how the 3-Racing ones work out.
- Lightweight gear shafts. There's no rotating mass to save, and the mini as a whole is light enough,especialy with LiPo batteries. Waste of cash.
Alloy uprights
The front steering uprights on the M03 are direct from Tamiyas parts box, and therefore,
parts from TL01, M03, MO3L, M04L, FF02, Wild Dagger, and Mad Bison cars, will fit.
The alloy part, is to me an essential upgrade. The plastic parts can break, but the main problem is the design of the steering linkage.
The ball ends screw directly into the plastic on the upright, at the end of what is effectively a lever.
The turning forces, (let alone the crashing forces), are enough that the ball ends work themselves loose in the plastic.
Not enough to notice unless you are looking for it,
but enough that the car won't steer in a straight line, and constantly needs re-trimming either left or right.
Over time, the kingpin bolts, which hold the uprights top and bottom, will work loose, and fall out on the track. They are threeaded directly into the plastic, and sooner rather than later, the thread wears out.
Alloy steering uprights fixed this for me, without recourse to buying expensive servos, or servo savers.
Tamiya make an alloy steering upright. Part number 53523. This is what I used on my previous mini, but the
Tamiya part is now very expensive in comparison with other options.
3-Racing make a part, but even these are now over a Tenner, even from Hong Kong.
So I have taken a gamble on a manufacturer I haven't heard of, and bought a pair from GPM.
All the M03 Alloy steering uprights, are designed for the original SWB mini. The M03M models, and the later,
post 2006 M03L models have so called "lightweight" steering components
which have smaller bearings, and are a different size.
To fit the alloy steering blocks to a M03M or later M03L, you need to buy...
- 4 bearings of the right size, (11x5x4)
- The parts sprue with the correct C-Hubs, Tamiya part number 50736, (It's a TL01 part number)
- 4 step screws, which act as the C-Hub kingpin screws. Part number 209009
Don't forget to use threadlock on the kingpin step screws when assembling the alloy uprights. Don't be tempted to use threadlock on plastic uprights. You'll never get them apart again.
Shocks
The shocks which come with the kit are frankly, rubbish.
I did run with them at first, I hunted information across the web, I made modifications, used different greases.
At the end of the day though, they are no match for oil filled dampers. The day I fitted my new shocks to the car,
I took over a second and a half off my lap times.
There are a number of options for shock upgrades. 3 from Tamiya, and one from 3-Racing.
I have read about using touring car shocks, but these are typically longer, and will raise the ride height much too far.
When I tried this with some HPI shocks, I placed spacers inside the shocks to limit the ride height.
However, this limited the overall travel of the shocks to just 2mm when setting the ride height of the mini to something approaching sensible.
Conclusion... You cant use touring car shocks.
The options I'll show below are the most commonly recommended.
All of the Tamiya options are now more expensive than they were even a year ago.
My choice for the previous mini, was to buy 2 pairs of the Tamiya C.V.A. Super Mini Shock Unit Set Part number 50746.
These come with oil and silver springs, at a current price of circa £13 a pair.
An often quoted alternative is Tamiya CVA Mini Shock Unit, Part number 53619. These come in a set of 4, with oil,
but no springs, no hardship as you'll probably be wanting aftermarket springs anyway. These currenly come in at around £18 if you hunt around.
Both of the above options are plastic.
Tamiya teflon alloy shocks are a silky smooth option, for those who want the best and are prepared to pay for it.
Tamiya #54000 M-Chassis Aluminum Damper Set - 4 pcs M03 are currently around £30, and come in a boxed set of 4 complete with white springs and oil.
The 3-Racing alloy shocks, look very similar to the Tamiya shocks, but cost half the price at around £15.
There have been some reports of them breaking, and the quality isn't quite up to that of the Tamiya alloy shocks, but they seem like a good deal.
Along with the shocks, you'll likely be wanting some after market springs.
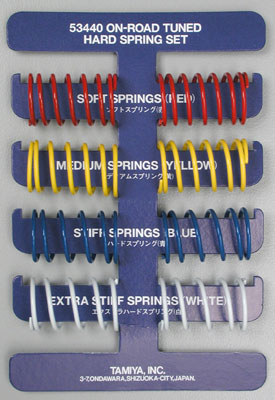
Mostly, Mini setup guides will reference the Tamiya On-Road Tuned Spring Set part number 53163.
These provide red yellow and blue springs, soft, medium and hard, with the yellow mediums for the back of the car, and the blue hard springs for the front.
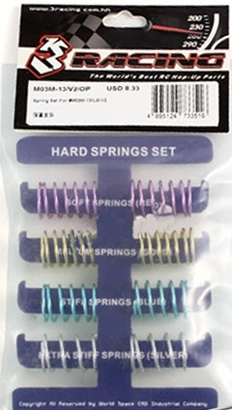
The Tamiya spring set is now around £8.00, so I went for the 3-Racing set at £4.50, which provides a super hard spring in addition to the 3 Tamiya
equivalents.
If using the 3-Racing set, then use the golds on the back, and the light blues on the front.
Tyres and wheels
Tyres are the single biggest change you can make to the car.
I have tried about 5 different types of slick and treaded tyre, and have yet to find anything better than the tried and
tested combination of M-grips front, S-grips rear.
These tamiya tyres have offered the most consistent grip characteristics on tarmac for me in the past.
If you can find slicks which work, then you should be aware that they are slightly smaller diameter than the Treaded tyres,
which will alter the gearing enough to make the car slower on the straight.
It will also lower the ride height, which, while generally a good thing, to get the Center-of-Gravity lower, can sometimes upset the handling when the bottom of the chassis is dragging along the ground.
In the wet, try M-grips front and rear, and in merely damp conditions, try S-grips all round.
Shell.
Aerodynamics make no difference at these speeds, so don't bother selecting on the basis of sleekness. Each of the Mini shells, the Suzuki and the Fiat 500 work as well as each other.
I can't help but think though, that a lower profile shell like the Alfa Mito shell supplied with the M05 kit, (Won't physically fit the M03 cars), might have some effect.
Pricing, (current)
So what did I buy?
... and how much did it cost, (in October 2010).
| Item |
Code |
Sourced from |
Cost |
| TAMIYA MINI COOPER S - M-03L |
58400 |
Fusion Hobbies |
£99.00 |
| 3Racing Alu Oil Damper Set M03/M04/M05 |
#M03M-13/LB/V2 |
Dinball (via ebay) |
£14.69 |
| 3Racing Spring Set For M03M-13/LB/V2 |
M03M-13/V2/OP |
Dinball (via ebay) |
£4.39 |
| "Black Can" Tamiya RS-540 Sport Tuned Motor |
53068 |
ebay various. Look out for the best deals |
£14.38 |
| Tamiya M-Chassis 60D Super Grip Radial Tires, 1Pr |
53254 |
ebay various. Look out for the best deals |
£9.99 |
| Tamiya M-Chassis 60D M-Grip Radial Tires 1Pr |
50684 |
Dinball (via ebay) |
£5.49 |
| GPM F KNUCKLE TL1021 S fits TAMIYA MINI CHASSIS M-03 |
n/a |
ukrc (via ebay) |
£5.79 |
| 5x11x4mm 5x11x4 Tamiya 1150 Bearings Bearing x10 |
n/a |
rcbearings.co.uk (via ebay) |
£4.75 |
| Tamiya TL-01 B Parts - Upright |
50736 |
Fusion Hobbies |
£7.75 |
| Tamiya 4mm x 11.5mm Step Screw for 58154 (x4) |
209009 |
Fusion Hobbies |
£2.00 |
| Postage (all postage costs) |
|
|
£11.50 |
| TOTAL |
|
|
£179.73 |
And you'll need to budget for whatever paints you want to decorate the shell.
In order to operate it, you will also need a transmitter and receiver. Prices range from £35 to in excess of £400, but they all do basically the same job.
Build
I'll describe my build here, but it's well worthwhile hunting out other guides on the net, starting with this one
here on RC-Mini.
Start by doing all the things which you'll need to have prepared at the end of the build.
By this I mean
- Gluing the tyres to the wheels.
- Masking off and painting the shell
- Rebuilding, refilling the shocks, so they are ready to go straight on.
Shocks
Discard the kit shocks. You will never use them. (The springs might be useful one day I suppose).
This time, I have chosen to go with the value for money 3-racing shocks. They arrive already built,
but not very well.
Two of the shocks had large amounts of air in with the oil, so they all came apart for a rebuild.
I'm going to use AE 40wt oil all round, as that's what I have in the spares box right now.
The springs I'll be using are the 3-racing spring set, designed for use with the shocks.
Using the Tamiya shocks and springs on my last car, the best setup was with Blue stiff springs on the front,
and yellow medium springs on the back.
The 3-racing springs have soft(purple/red), medium (gold), stiff (turquoise), and super stiff (Silver).
Not having used them before, I'll start with the medium (gold) on the back, and the stiff (turquoise) on the front,
and see how it goes.
The black springs which come with the 3-Racing shocks, are just fractionally harder than the medium, (Gold) springs.
The Tamiya silver springs which come with the mini kit, are longer,
and somewhat stiffer than the 3-racing stiff (blue) springs, almost as hard as the supperstiff.
Gearbox
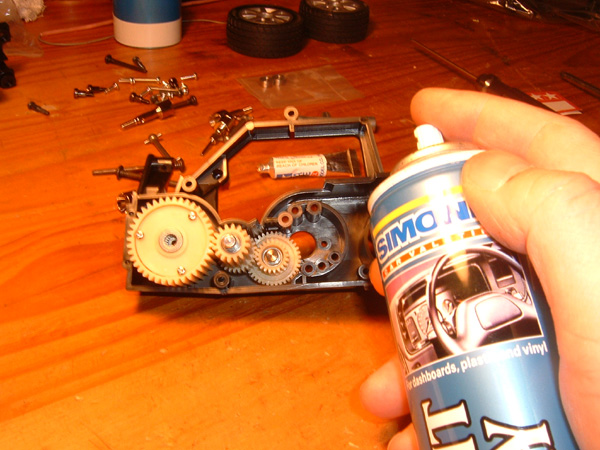 So the first thing you do, is find Bag-A, open it, and throw away the plastic gearbox shims.
At best, these will slow your car down. At worst, they will melt into a sticky mess requiring a complete gearbox rebuild.
They are size 11x5x4. That is 11mm outside diameter, 5mm inside diatmeter, and 4mm thick.
Replace them with bearings. You don't need super top quality, ebay is your friend. Expect to pay £5 or £6 for a pack of 10,
or similar money for a M03 bearing upgrade kit which will contain bearnigs of this size.
These are the same size bearings you need for the alloy steering upright upgrade.
You'll also find 2 bronze bushes in the kit, which go in the gearbox. These are size 8x5x2.5.
I happend to have some bearings of this size in my parts box, so didn't need to buy any.
Buying individual bearings of this odd size can be expensive, so the cheapest way of finding them is to buy the M03 bearing upgrade kit,
which should come with all the gearbox, and wheel bearings you need.
Once you have the bearings, clean them out with motor spray, (cheap bearings are invariably packed with stiff grease),
until you can ram them on to the end of a pencil, and see/hear them spin for 15 seconds or more.
Then oil them with a very lightweight gear oil.
I use LRP Blue Factor because I managed to pick some up in a sale. I have also used sewing machine oil, and model railway oil.
In a pinch, I use bog standard 3-in-1, but that is a little heavier than the other options.
When building the gear diff, I use a minimum, just a smear, of the supplied grease on the planetary gears inside the diff.
Then, when building up the gearbox into the body halves, I don't use any grease at all.
Instead, use some silicone spray, the kind of stuff you can buy from Halfords for sprucing up car interiors.
If you cant find any of that, then some spray furniture polishes have a high silicone content.
You'll need to respray the gearbox every 20 races or so to keep it fresh, but the performance increase is worth the maintenance.
You would think that the gears would wear out faster than with grease, but I raced the car for over a year with the same diff in. No wear was apparent on the gears in that time.
That's it. Now build the gearbox as per the manual.
Hints and tips
When putting the servo saver together, spray the plastic parts with the silcon spray. It avoids stiction and helps the steering to center.
When building the alloy steering uprights into the C hubs, use a small amount of threadlock on the king pin screws.
I say a small amount because that's all you need.
Don't do what I did, and use more than "a little bit", because then you get threadlock into the hole in the C hub, which makes the steering bind, which makes the car a real handful to drive.
In fact it makes the car impossible to drive, and yet, the effect is subtle. I didn't find the problem until I took the C-hub and steering upright assembly off the car. It was undetectable which still on the car.
Running
Motor selection and care
The current Adur rules allow for the orginally supplied silver can, or the Tamiya Sport Tuned, (aka Black Can), motors.
Of these, the black can is noticably the best performer on the track.
You'll no doubt hear a lot of guff about breaking the motor in, dipping it in water, or soap solution, spraying it with secret stuff before a race.
I'm not going to say it's all a crock, but I have found no advantage.
Nowdays, I just stck a motor in the car and run it. No prep, no waste of time, maximum racing.
You will need to keep it clean. Take the motor out of the car every so often, (2 meetings, 8 or 10 races),
and spray with motor spray... a.k.a. Clutch and brake cleaner. (Not WD40, which will gum the comm up).
Once the spray runs out of the motor clear, shake the motor dry, and oil the bushes at both ends with light machine oil (same as for the bearings, or 3-in-1). Thats it.
Setup tips
- Put softer tires on the back than the front.
- Use softer springs on the back and harder springs on the front.
- If you have an older model, upgrade to the rear toe in blocks for greater stability.
- Set droop by using spacers *inside* the shock bodies.
- The Standard, M-Grip and S-Grip tyres are larger diameter than slicks, giving more top speed.
- Don't be tempted to use Touring car wheels and tyres. It unbalances the car and causes grip roll and strange corner exit behaviour.
- Some people build the reciever and ESC into the body of the car to get the weight lower. I have found no advantage.
- When using LiPo batteries, you will need to add lead to get up to the minimum weight of 1300g.
Running the car lighter gains a marginal improvement in aceleration, but you lose out in cornering. I pack the front and rear bumpers, and add the remainder of the lead low in the rear of the chassis.
The car really does work best at 1300g of thereabouts.
- when choosing a LiPo, remember that the car is designed for older stick packs, so you'll need to find a LiPo with rounded edges which physically fits in the car. Some people claim to have modified the M03 chassis to accept rectangular LiPos, but I think there's a reason why there are no pictures or instructions on the 'net.
- The Tamiya battery-->ESC connector will heat up in use, and after a couple of laps, will slow you down through increased resistance. Cut it off, and solder on deans plugs or similar.
Conclusion
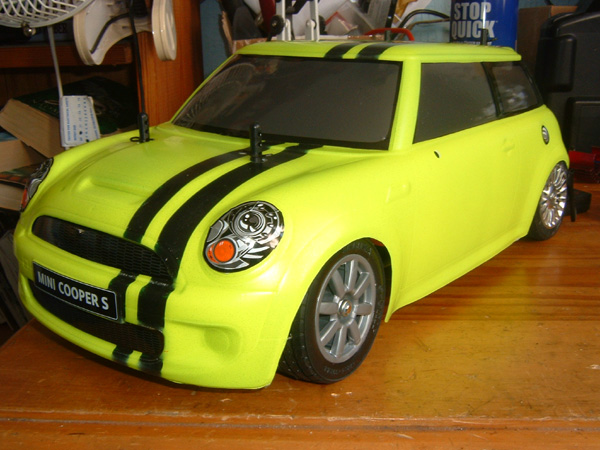 So that's about it. All I know about Tamiya minis. I've probably left out a lot, because I don't know it, or haven't tried it.
Read up on it yourself, start with the links below, and then maybe try googling for "racing" "Tamiya" "mini", and see what comes up.
Here's my new mini, ready to roll.
Resources.
UK based Shops which sell minis and spares
Info and knowledge sharing sites.
Follow ups
Slick tyres
Update 27th Feb 2011
I have been doing some testing with Pit Shimizu slicks.
I started with D27R compound all round, which worked better than the treaded tyres, but was still a little too much bite on the front.
Later I tried D33R compound on the front, retaining the D27R on the rear. this worked much better. Under race conditions though,
I have not yet bettered my performance on the S&M grips by using slicks.
The half a meter I gain through the infield is lost down the straight because of the rollout difference caused by the smaller tryes.
Update 11th July 2011
I've settled on D36R on the front and D27R on the back.
On a warm day, in the support class for the BRCA Clubmans champuionship round, everyone was struggling for grip except me.
If anything the car was too sticky, and hopped a little around the corners.
However, I qualified pole, setting a new track record in the process, notwithstanding the speed penalty for running smaller diameter tyres.
The fronts do wear quickly though. After six 5 minute races, the fronts are nearly shot, with a clear "insert groove" worn into the surface of the tyre.
It's possible that a harder insert may help with this wear pattern, because there is still plenty of rubber left.
Update 4th August 2011
The wear on the front tyres has got no worse after putting 10 more 5 minute races on them. the 27 rears are still effectively unworn.
So the front's will give over 90 minutes of track time for $10.50, (circa £7), which I think is pretty good. Especially when compared to touring car tyres.
In the past 10 races, I have broken the track record 3 times on these tyres, taking a total of over 10 seconds out of my previous time on the S and M grip tyres.
To make them work at their best, I have had to reduce the propensity for the car to grip roll, by lowering the ride height, and moving weight lower in the car.
Steering uprights
Update 27th Feb 2011
The GPM F KNUCKLE aluminium steering uprights have a different profile to the Tamiya ones. The mounting point for the ball upright is lower.
This has lead to the steering rods binding on the gearbox on right handers. for the moment I have cured this by adding 2mm spacers under the ball uprights
to increase clearance for the steering tie rod ends.
I've used threadlock on the ball upright thread, as it no longer screws all the way into the mount, and is less secure.
Update 11th July 2011
A hard whack against the pit lane boards snapped the brass steering upright off it's thread. Having threadlocked them in, it's hard to get the sheared off end unscrewed, (But I will... I will)
An alternative to the brass steering ball uprights, which can be used on both plastic and alloy steering blocks, is to thread a 3mm bolt up through the bottom of the hole.
Onto this upright bolt, slip 6mm or 7mm of spacers, topped off with a 5mm ball end (Tamiya part number 53640).
This is a far stronger and slightly taller arangement, which solves many of the Mini's steering problems.

Shocks
The 3-Racing shocks have been very good. I've now had them on for 5 straight meetings and they are yet to start weeping oil. A feat that I have only seen with Tamiya and HPI shocks before.
Very impressive.
Yeah Racing Shocks
I have recently acquired a set of Yeah Racing springs and shocks.
I had thought they would be the 55mm, which yeah racing list as being the M03 compatible size,
but on correct assembley, thay measured as 50mm, (center to center) which means thay only have circa 6mm of travel.
Never mind, the price I paid is small enough that it is worth it to have a play, and however good or bad they turn out to be, they must surely be better than the Standard Tamiya friction dampers.
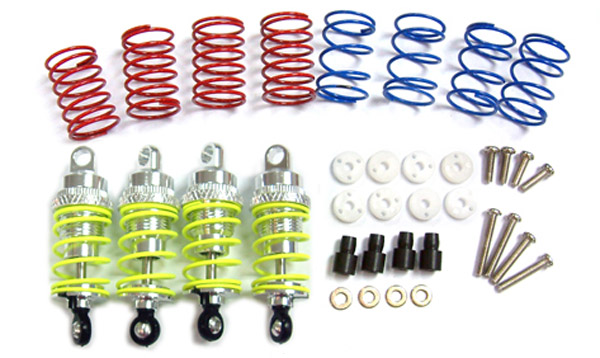
I've measured the springs and added them to the table below.
First impressions
The Shocks are not as well made as the Tamiya or 3-Racing shocks.
- The alloy seems to be rougher cast and less well finished
- The spring collar thread is coarser
- The action feels rougher.
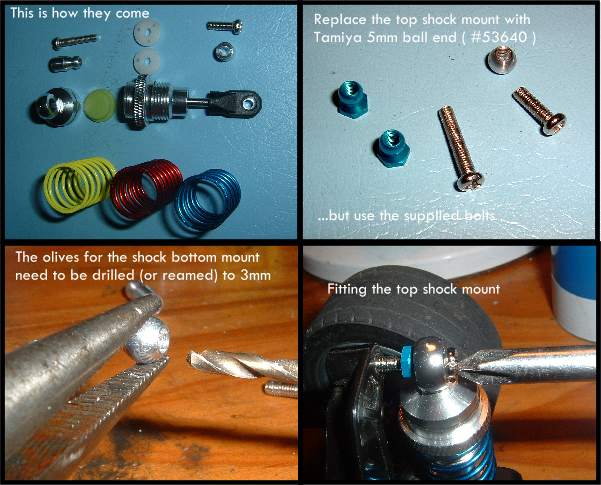
- The olives in the bottom shock mount needed reaming out to allow the 3mm bolt through.
Build
When building, I found that they are much harder to work all of the air out than the Tamiya or 3 racing shocks.
It seems that some air gets trapped under the piston whatever you try, and the only way to get it out is multiple rebuilds and long waits.
The shocks come with 1. 2 and 3 hole pistons. I've gone for the middle way, and fitted 2 holes to start.
I have filled front and rear with Serpent 500cwt silicon oil. This is roughly equivalent to AE 40wt according to the viscocity tests I have done in the past.
fitting
It is clear that these shocks are not designed for the M chassis.
The standard fittings for the top of the shock position it to far away from the car and mean that the spring perch fouls the bumpers both front and rear.
I have used alternative fittings from the spares box to help out as shown below.
The 5mm ball end (Tamiya part number 53640), proves its usefulness as a parts box staple once again, replacing the top shock mount
but still using the Yeah supplied 16x3mm bolt, which now threads entirely into the shock mount to give a very secure fixing.
The bottom of the shock can be bolted straight to the wishbone with the Yeah supplied 10mm bolt.
Both front and rear, they could really do with being spaced out with 1mm spacers, but I believe that would not leave enough thread to make a secure fixing.
That is, the bottom mounts would need 12x3mm bolts, which I don't have in my parts box.
As it is, the shocks have a slight tilt, but I'm willing to live with it.
I've chosen to use the Yeah racing springs to start with, blue on the front, and yellow on the back.
In use
The car felt a bit bouncy in comparison with the 3-racing standard shocks.
As the springs fitted are comparitively softer than those on the 3-racing shocks, my immediate theory is that there is too much compression damping holding the car up and causing it to "skip" over the track.
I will rebuild with more piston holes, and lighter oil.
Although research on the usual forums tells us that the Yeah Racing shocks are prone to oil leakage, I have seen none so far.
Springs
The 3-Racing springs seem to work well as alternatives to the Tamiya ones.
In fact, looking at the pictures below, it's hard not to come to the conclusion that they are manufactured in the same factory.
The Yeah Racing springs are softer all round for the equivalent colouring, and are slightly larger in diameter.
They probably didn't come from the same source.
| Weight |
Spring Rate |
Tamiya |
3-Racing |
Yeah Racing |
| X Hard |
|
|
Silver |
|
| V Hard |
17.24lb |
White |
|
|
| Quite Hard |
|
Std mini Silver |
|
|
| Hard |
15.27lb |
Blue |
Light Blue |
|
| Medium/Hard |
|
|
|
Blue |
| Medium |
13.24lb |
Yellow |
Gold/Black |
|
| Soft |
12.90lb |
Red |
Purple |
|
| V Soft |
|
|
|
Yellow |
| Super Soft |
|
|
|
Red |
Servo Saver
The Trick Bits TB3007 I bought from Antics Model Shop
The TRX1844, Traxxas Large Servo Saver came from m.k.models  There are other differences between the models as well.
Notably, the M03L Mini Cooper S, and the M03M kits, (the Suzuki Swift, and Fiat 500), come with wheel bearings as standard, instead of the plastic bushes
which Tamiya like to provide. They still have no bearings in the kit for the gearbox though, which you need to source elsewhere.

 So the first thing you do, is find Bag-A, open it, and throw away the plastic gearbox shims.
 So that's about it. All I know about Tamiya minis. I've probably left out a lot, because I don't know it, or haven't tried it.


